Quality code and lots of coffee

Tag: unix

Server Architecture

Building an application is only part of the process; a platform to run your code on is just as important to know about. Environmental differences can cause unexpected bugs in your code and having a knowledge of of server architectures can be a vital asset to your tech stack. Servers need to perform a range of tasks, including manage domains and user groups, permissions, and run your applications – ultimately to provide a service to you.  These services can include web services like IIS or Apache, Databases such as SQL Server or MySQL, email services like Exchange or Postfix/Dovecot.

As well as having an in depth knowledge of desktop operating systems Windows XP – Windows 10, and Linux environments such as Ubuntu, Fedora and OpenSuse I have an extensive knowledge in both Unix and Windows Server. Windows server as always provides the advantage of managing everything through a GUI, giving your server management a little bit of ease, and being able to run some development tools natively is always a bonus.

Running a Unix server by comparison is a lot more hands on, but provides much greater flexibility when it comes to server architecture (As well as having the bonus of being free), and with the new territory of .Net Core Unix is becoming a more viable option in businesses. I am familiar with most Debian and Redhat bases systems – in fact this website is running on a CentOS system running in the cloud.

It is one thing to know that these services are available to you, but understanding the alternatives on both platforms, as well as how to set up and use these platforms is a valuable skill.

.Net Core 2 – Cross Platform Code

When I started programming properly in 2012 during my degree, there were a few truths. C# and Visual Studio were for Windows. Python and Perl were for Unix and Mac OS was something I just didn’t want to ever touch.

Visual Studio also cost a bomb – I only had a copy because my University was kind enough to furnish me with a 2 year licence for VS2010 which I used in full, then just before my account was suspended managed to nab a copy of VS2013 which carried me til 2016. I tried making a few cross platform apps in the beginning, but unless I was using Mono or something far more basic like JavaScript – then cross platform wasn’t really a thing.

Lo and behold Microsoft go and change up their style – they’re now shipping free version of Visual Studio, and not only that but the community editions are actually quite powerful (this might have always been the case – but since I had free professional editions I didn’t look too hard). Either way I’m impressed with the level of features available in the community editions – Especially with it being free. Then a few months later one of my co-workers Rogue Planetoid mentioned that Microsoft were releasing the .Net Core standard – a cross platform SDK for visual studio, capable of being run on Unix, Mac and still natively on windows.

The framework

This might be old tech as of writing this as the .Net Core 2 standard is released, and I never bothered to give 1 or 1.1 a go – but I finally did get round to upgrading VS2017 Community and getting the SDK from the Microsoft site.  I won’t go into what it was I was working on because frankly that’s a bit of a lengthy conversation [My GitHub for the project], but it was effectively a console application. At the moment .Net Core 2 supports ASP Net websites and Console Applications. So unfortunately my bizarre love for windows forms isn’t yet supported. But I was keen to get my console app running on my Centos server.

First of all you can’t change an existing application over to a .Net Core app – or if there is I couldn’t see the option. So I had to create a new project and then port over my code. Thankfully this provided an excellent excuse to refactor my code. I did particularly enjoy that the code, for lack of a better term, just worked. I didn’t have any 3rd party NuGet packages or extra content, so the basic windows libraries could just be bolted on and the code compiled as normal. Within about 20 minutes I had completely ported over my applications, an hour after that I’d made it a little prettier.

Since I was finally moving my code over to the same server as the database I decided to remove the API calls and use a direct MySQL connector – now this meant that I did have to get a NuGet Package – specifically MySQL.Data this currently supports the standard .Net framework but it isn’t supported on .Net Core yet unless you get the RC or DMR version. I installed that, did some upgrades and compiled the app.

Setup on the Unix server

So – running it on Centos; I initially went and downloaded the 64 bit runtime binaries from the Microsoft blog local to my server, I then unzipped them and followed the generic instructions. Microsoft instructions tell you to unzip them and leave in your home directory for use but I wanted to put them in more of an application directory, so I did the following.

cd ~/ 
mkdir dotnet
cd ./dotnet
wget https://download.microsoft.com/download/5/F/0/5F0362BD-7D0A-4A9D-9BF9-022C6B15B04D/dotnet-runtime-2.0.0-linux-x64.tar.gz
tar zxvf dotnet-runtime-2.0.0-linux-x64.tar.gz
cd ../
mv ./dotnet /etc/

This then meant my .Net Core directory was at /etc/dotnet/… and I now needed to register the new application. Microsoft tells you to execute this in your command line but I found that each time you restarted your shell session it would forget what you’d set up, so in the end I added it to my local .bashrc file.

nano ~/.bashrc
#then at the bottom of the file added
export PATH=$PATH:/etc/dotnet

Save and now I could run any dotnet applications with the command dotnet such as “dotnet -h”

I did have some trouble on my first application run due to some missing libraries, but they were pretty easy to install through the usual package manager

yum install libicu libunwind

Package & Run my App

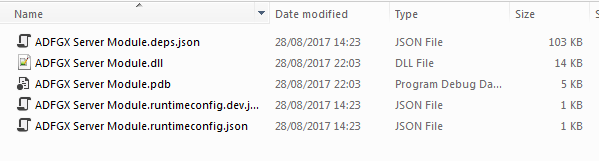
So I’m used to a console application building and dumping an executable in the output directory with an App Config and some, .Net Core uses JSON files and DLL’s for it’s binaries, though they shouldn’t be treat any different really, the main difference to factor in is that your unix installation doesn’t have a GAC – the GAC is the global assembly cache; when you run an application on windows, normally if the code references a DLL it’ll ask the GAC where the install path is, so it can be referenced and used as normal, even if that DLL hasn’t been shipped with the application.

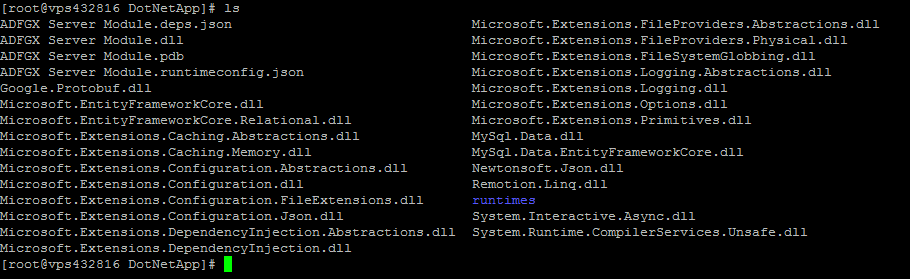
Unix obviously doesn’t have a GAC – so when you try to run your application you need to make sure that instead of just moving your JSON and DLL files up to the server, you actually publish the application and move everything. To show you what I mean, below is the difference between the standard “Build” output of a .Net Core application vs the “Publish” output of the application.

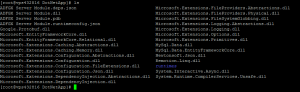
The publish job packages up everything, including runtimes and referenced libraries, so in order for this to run on Unix, I needed to publish the application and move that output onto the server. Once it was on the server I could get away with just moving my main DLL up, but you must publish at least once or you may start to get runtime errors.

Once it’s all on your server, let it run.

dotnet ./ADFGX\ Server\ Module.dll

or if you want it to run in a background session kick it off with a screen

screen -dmS DotNetApp dotnet ./ADFGX\ Server\ Module.dll
screen -x DotNetApp

Conclusion

All in all I’m very pleased with the .Net core stuff, it’s downsized the number of IDE’s I need to have installed and means I can now start hosting some more windows technologies on my Unix server which should save me a few pennies as well.

Hopefully in the coming months we see Microsoft bringing out some more application types and looking forward to more NuGet support. But what I’ve seen so far of .Net Core seems really stable, very easy to set up and really easy to migrate your existing stuff over to.

Unix Command Line Cloud Storage

When I originally set up my Minecraft server some 4 years ago I designed a script to automatically backup the world, plugins and database entries to a Dropbox folder, the script would run in the middle of the night and email me with the output, such is the beauty of cron. The Dropbox daemon running in the background would pick up the new files and sync them online. A simple solution.

As time went on the script became more complex to handle certain issues I had – making sure before we backup the files the previous were deleted, and when they were deleted we wait for dropbox to finish syncing before shoving the new ones in its place. That tended to avoid most data conflicts I experienced.

Eventually as time went on and we moved away from Minecraft (although still running it) we started hosting websites for ourselves, small projects we work on and even some other people. It became sensible to extend the script to backup websites, mail directories and server configurations, in the event of a system collapse. Dropbox, despite its many features, didn’t provide enough space, I’d managed to accrue 3.5gb of free space through the various bonus’ they have but it was no longer enough. On top of this our Minecraft server runs Centos 5 – which although still supported by RedHat until 2017 is old, after a recent format of the MC server I tried to reinstall Dropbox only to find that Dropbox could no longer be run, and even if I downgraded there was no way to connect the server to my account due to the version difference. After asking on the Dropbox community if there were any plans to go back to support RHEL5 it was a begrudging no.

Alternatives are available, due to a bonus I received with my phone my Google Drive has over 100Gb of space, but no command line (nothing official or native at least) I had a look around at some of the other Cloud Solutions and found Copy.

While not seeming very elaborate or exciting (as exciting as cloud storage can get) it was supported on Android, iOS, Windows and Linux – as well as providing 15GB for a basic account . This would easily cover my needs.

Unfortunately, Copy also didn’t provide support for RHEL5, so as it happens my MC server is still without a proper Daemon running. However I’ve worked around it by using an SCP script to just shove everything onto my newer, fancier, RHEL6 box.

The Copy daemon can be downloaded from their site in a .tar.gz – uncompress it and stick it somewhere where you normally stick programs. For me it was /etc/copy/

wget https://copy.com/install/linux/Copy.tgz --no-check-certificate
tar zxvf ./Copy.tgz
mv ./copy /etc/
cd /etc/copy/x86_64

If you’re running purely in command line the only thing you need to run is CopyConsole, which can be found in either the x86 or x86_64 folders. Initially to set it up you need to provide your username, password and the directory you wish to set as the directory to sync.

mkdir /root/Copy
./CopyConsole -u=myemail@domain.com -p="my password with spaces" -r=/root/Copy

This should then connect to your account and try to sync. Try adding some files through the web interface and seeing if you notice them downloading. Obviously running the command in the foreground you’re stuck watching the console, so run it in a screen. Once you’re ran the Console app with the required arguments it will have written a config in your home directory, so you don’t need to pass them again and always have them visible in your processes.

screen -dmS CopyDaemon /etc/copy/x86_64/CopyConsole -r=/root/Copy
screen -x CopyDaemon
Ctrl+A+D to detach from screen

That will let your app run happily in the background, and anything you put into /root/Copy will be synced. One other thing to do would be to check that the daemon is running when you do your backup job – I’m not sure how reliable this service is yet.

echo "Checking Copy Daemon status..."
SERVICE='CopyConsole'
if ps ax | grep -v grep | grep $SERVICE > /dev/null
then
echo "$SERVICE service running"
echo ""
else
echo "$SERVICE is not running, Starting now"
echo ""
screen -dmS CopyDaemon /etc/copy/x86_64/CopyConsole -r=/root/Copy/
sleep 10
fi

The only downsides to Copy over Dropbox is that I find the sync speeds much slower, there is also no Status interface, so I can’t quite figure out to automate checking if Copy is done Syncing, however it seems to be a bit lighter on the processor (much more so than Google Drive) so all in all seems a worthwhile investment until Dropbox offers up more support or Google Drive goes native.

Sources:

  1. Dropbox
  2. Copy
  3. Checking to see if a service is running in a shell script

VNC Brute Force & Tunnelling

On my Linux blog I posted a few bits and pieces about my Raspberry Pi, (one post of which I think found its way to this site, but I digress) One of those posts was about setting up a VNC server on a Raspberry Pi to allow remote control over your network.

Now I used VNC a lot in my home, primarily for my laptop and home entertainment server as I like to control them from across either the living room or my bedroom, as they’re mostly used for media. So since my RPi was going to be my one-stop-shop for media, file storage and if I ever get round to it, some server hosting. I thought I may as well configure the VNC server to be accessible from the internet.

Similar to when you’re learning to drive, you never really know why you have to check your blind spot until you’re in a situation where you really should have checked your blind spot.
I.E you just nearly side-swiped somebody.

I used to have the same mentality about security, I always chose strong passwords that’s obvious but never bothered with firewalls or encryption or anything of that nature. Not with anything as harmless as the remote control I use for my server anyway.

Well for my VNC application I had some issues with password authentication, so I foolishly thought “Nah nobody will ever try VNC on this particular IP” how wrong I was. Not more than a week later I sat down to watch some TV and found that there had been some files downloaded to my desktop, some windows opened on my web browser and somebody had tried to install something. It’s a very odd feeling to have been ‘hacked’ (I use the term loosely because it was my own fault) but thankfully my external HDD hadn’t arrived yet and so the pi held little more than the OS and a wallpaper jpg. Needless to say I formatted the hard drive and put a strong password on my VNC access as well as removing password-less command execution from the default Pi account, so now I need to put in my password before executing anything (which incidentally has broken the shutdown button)

Then over the past few weeks there have been instances where I couldn’t connect to my VNC server, I chalked it up to Linux being a bit dodgy on some software packages, particularly with the arm architecture, however today I thought I was going to get to the bottom of it. When checking the screen that VINO was running in I found a series of deferred authentication attempts, and a new one was being written every second. After a brief look on the Ubuntu forums I found that it was in fact evidence that a brute force was taking place, trying to break in through my VNC password.

Thankfully Vino has a feature where after a few consistent attempts at a password it will assume there is a brute force taking place and immediately start to deny everything coming in, which I was thankful for since there are actually now files on that server.

So since it appeared that I was still not safe from pesky hackers (and I was being hacked this time) I had to beef up the security. Putting even stronger passwords on my VNC and user account on the pi. After some research I decided the best course of action would be to actually tunnel the VNC connection through my SSH.


It was the diagrams that really sold me on it

The benefits of this being that any data sent between the remote host and the client are actually encrypted through the SSH Server (which is a fair bit more secure than a standard VNC Connection), and SSH tunnelling means I don’t have to have a port forward for the VNC server itself, just the SSH server. So with the 5900 port switched off on my router, I was able to tunnel my VNC connection through the SSH server and back out to the other side – where it connected to the actual VNC server. Theres a very handy wiki on how to VNC over an SSH Tunnel here link so I won’t bother recounting my steps. It’s also very straightforward and the android app I use for VNC had an option to use SSH tunnelling (which you can find here) so I didn’t even need to find a new VNC app.

As an added precaution I changed the default port of my SSH server from 22. Since I now knew brute forcing random IPs was a thing I decided maybe being on the default option for everything was asking to be a target which you can do via the config found in

sudo nano /etc/ssh/sshd_config

probably best to take a backup though.

So there we have it, I was hacked and now I know more about SSH tunnelling and poor security.

Now we just wait for the next attack…

© 2025 Joe van de Bilt

Theme by Anders NorenUp ↑