On my Linux blog I posted a few bits and pieces about my Raspberry Pi, (one post of which I think found its way to this site, but I digress) One of those posts was about setting up a VNC server on a Raspberry Pi to allow remote control over your network.
Now I used VNC a lot in my home, primarily for my laptop and home entertainment server as I like to control them from across either the living room or my bedroom, as they’re mostly used for media. So since my RPi was going to be my one-stop-shop for media, file storage and if I ever get round to it, some server hosting. I thought I may as well configure the VNC server to be accessible from the internet.
Similar to when you’re learning to drive, you never really know why you have to check your blind spot until you’re in a situation where you really should have checked your blind spot.
I.E you just nearly side-swiped somebody.
I used to have the same mentality about security, I always chose strong passwords that’s obvious but never bothered with firewalls or encryption or anything of that nature. Not with anything as harmless as the remote control I use for my server anyway.
Well for my VNC application I had some issues with password authentication, so I foolishly thought “Nah nobody will ever try VNC on this particular IP” how wrong I was. Not more than a week later I sat down to watch some TV and found that there had been some files downloaded to my desktop, some windows opened on my web browser and somebody had tried to install something. It’s a very odd feeling to have been ‘hacked’ (I use the term loosely because it was my own fault) but thankfully my external HDD hadn’t arrived yet and so the pi held little more than the OS and a wallpaper jpg. Needless to say I formatted the hard drive and put a strong password on my VNC access as well as removing password-less command execution from the default Pi account, so now I need to put in my password before executing anything (which incidentally has broken the shutdown button)
Then over the past few weeks there have been instances where I couldn’t connect to my VNC server, I chalked it up to Linux being a bit dodgy on some software packages, particularly with the arm architecture, however today I thought I was going to get to the bottom of it. When checking the screen that VINO was running in I found a series of deferred authentication attempts, and a new one was being written every second. After a brief look on the Ubuntu forums I found that it was in fact evidence that a brute force was taking place, trying to break in through my VNC password.
Thankfully Vino has a feature where after a few consistent attempts at a password it will assume there is a brute force taking place and immediately start to deny everything coming in, which I was thankful for since there are actually now files on that server.
So since it appeared that I was still not safe from pesky hackers (and I was being hacked this time) I had to beef up the security. Putting even stronger passwords on my VNC and user account on the pi. After some research I decided the best course of action would be to actually tunnel the VNC connection through my SSH.
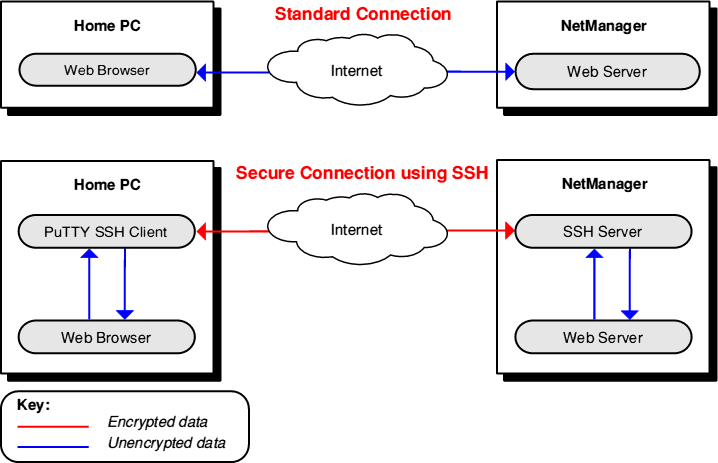
It was the diagrams that really sold me on it
The benefits of this being that any data sent between the remote host and the client are actually encrypted through the SSH Server (which is a fair bit more secure than a standard VNC Connection), and SSH tunnelling means I don’t have to have a port forward for the VNC server itself, just the SSH server. So with the 5900 port switched off on my router, I was able to tunnel my VNC connection through the SSH server and back out to the other side – where it connected to the actual VNC server. Theres a very handy wiki on how to VNC over an SSH Tunnel here link so I won’t bother recounting my steps. It’s also very straightforward and the android app I use for VNC had an option to use SSH tunnelling (which you can find here) so I didn’t even need to find a new VNC app.
As an added precaution I changed the default port of my SSH server from 22. Since I now knew brute forcing random IPs was a thing I decided maybe being on the default option for everything was asking to be a target which you can do via the config found in
sudo nano /etc/ssh/sshd_config
probably best to take a backup though.
So there we have it, I was hacked and now I know more about SSH tunnelling and poor security.
Now we just wait for the next attack…


Recent Comments