Quality code and lots of coffee

Category: Article (Page 1 of 2)

Getting Google Assistant to do just about anything

So Christmas is right around the corner and I was helping put up the decorations. One decoration in particular were some window lights that have multiple settings, you can control the settings via a switch on the cable or you can download an app and connect to it via bluetooth. Pretty nifty.

Our tree on the other hand is on a smart plug, which I can control via google assistant. Since google assistant can chain commands now it’s pretty easy to just tell her to “Let it snow” and she’ll turn on the tree, dim the lights, start playing a fireplace video on the TV and play my Christmas playlist on spotify – but those pesky lights in the corner won’t switch on til I boot up the app, start my bluetooth and connect. This would obviously not do – and I had to set about trying to bridge the gap.

The first thing to note with this is that Google Assistant doesn’t have an SDK (unlike Alexa which has events in AWS) so you’re a little limited. What I basically wanted was a simple command, such as “Hey Google, Switch on the window Lights” and have the window lights come on. So I did some research and found that although there is no SDK – there is an online service named IFTTT (If This Then That) where you can hook into google assistant. So in order to activate my lights I’d need to write an IFTTT applet.

The plan was simple. I’d write an applet that would send a signal to my Raspberry Pi – I would then write a script on my Pi that would make use of the bluetooth radio to contact the lights, I knew this could be done through python so I performed the actions on my phone, snooped the bluetooth actions and recreated them. Now all I needed was a trigger.

Applets are written throught the IFTTT Platform, The platform has an enterprise license and a personal license – so producing an applet for myself was free. I created as service for myself and went to Applets to produce one.

Clicking new applet the process was fairly straightforward, an applet is made up of a Trigger and then one or more Actions, so our Trigger we knew was google assistant. Once Selected you have a few choices to build your command structure, I went with a simple command and text ingredient, this is the phrase you say after “Hey Google” and the dollar sign $ is a wildcard of what you say afterwards, so I simply set mine to

Pi Function $

I chose Pi Function because for some reason my assistant struggled to make out “custom function” and kept thinking I was after info on Canoes. After you’ve set up a command format you can tell it to say something back to you and that’s the trigger all set up.

The action is a little more complicate, I figured the easiest thing to do for my Pi would be to get an API hit. I could host a php page fairly easily and my IP is fairly static, enough for Christmas at least. So I wanted something that would send a web request.

After searching the available Triggers I happened upon the Webhooks service, which sends a formatted request to any endpoint you like. When you set up the Webhook you can set the fields to be static values, or let your users select their own when you come to set up the applet. I elected the latter option as even though this was private, I didn’t want to list my endpoint explicitly.

The only ‘gotcha’ is passing the text ingredient – IFTTT won’t let you use the text ingredient unless it’s explicitly set in the applet settings, so for the content type and body of the webhook I set a JSON request including the text ingredient.

So as you can see I’m sending a JSON Post request to my endpoint, including a secure key so others can’t just spam my endpoint – and passing in a function param which is the text of the function I want to run.

Once the applet has been created – you should have the option to active the applet against your account. You may need to allow IFTTT to have some permissions against your Google account, but once added you should be able to set the correct endpoint.

Now all I had to do was write a PHP script to pick it all up. I installed apache, secured the connection with certbot and wrote a few scripts. I was essentially going to be making use of the php shell_exec function, so I just needed some scripts in the web dir to get me started. One of the important things was also writing a script to log the requests that came in, just in case I did start getting some abuse. My api.php looked like this

<?php

ini_set('display_errors', 1);
ini_set('display_startup_errors', 1);
error_reporting(E_ALL);
header("Content-Type: application/json; charset=utf-8");

// Takes raw data from the request
$json = file_get_contents('php://input');
$data = json_decode($json);

if ($data->API_KEY == "OBFUSCATED FOR REASONS") {

    //Log the request
    $IP = $_SERVER['REMOTE_ADDR'];
    $Function = $data->Function;
    $output = shell_exec("./LogRequest.sh ".$IP." ".$Function);


    //Now we need to run out request
    $function = strtolower($Function);
    if ($function == "restart" || $function == "reboot")
    {
        shell_exec("./restart.sh");
    }
    else if ($function == "kodi")                                                                                                                                                                                                                
    {                                                                                                                                                                                                                                                
        shell_exec("./kodi.sh");                                                                                                                                                                                                                 
    }
    else if ($function == "lights")                                                                                                                                                                                                                
    {                                                                                                                                                                                                                                                
        shell_exec("python ./lights.py");                                                                                                                                                                                                                 
    }
}

?>

Another GOTCHA you may find is that the text ingredient from IFTTT is for some reason limited to single words, this was a pain but not impossible – because google can indeed chain commands so you can link a weird command like “hey google, turn on the window lights” and make it mean “hey google, pi function lights”

The most interesting thing for me, as you may have noticed in my script, is that you don’t have to stop there – with an API hook on a Raspberry Pi – a lot more of the world is available to you, I added commands such as Reboort or Kodi so that when there’s an issue and I can just do these actions without having to pick up the remote.

I honestly believe that through shell scripts you can accomplish a lot – and with this tech in place I can make

.Net Core 2 – Cross Platform Code

When I started programming properly in 2012 during my degree, there were a few truths. C# and Visual Studio were for Windows. Python and Perl were for Unix and Mac OS was something I just didn’t want to ever touch.

Visual Studio also cost a bomb – I only had a copy because my University was kind enough to furnish me with a 2 year licence for VS2010 which I used in full, then just before my account was suspended managed to nab a copy of VS2013 which carried me til 2016. I tried making a few cross platform apps in the beginning, but unless I was using Mono or something far more basic like JavaScript – then cross platform wasn’t really a thing.

Lo and behold Microsoft go and change up their style – they’re now shipping free version of Visual Studio, and not only that but the community editions are actually quite powerful (this might have always been the case – but since I had free professional editions I didn’t look too hard). Either way I’m impressed with the level of features available in the community editions – Especially with it being free. Then a few months later one of my co-workers Rogue Planetoid mentioned that Microsoft were releasing the .Net Core standard – a cross platform SDK for visual studio, capable of being run on Unix, Mac and still natively on windows.

The framework

This might be old tech as of writing this as the .Net Core 2 standard is released, and I never bothered to give 1 or 1.1 a go – but I finally did get round to upgrading VS2017 Community and getting the SDK from the Microsoft site.  I won’t go into what it was I was working on because frankly that’s a bit of a lengthy conversation [My GitHub for the project], but it was effectively a console application. At the moment .Net Core 2 supports ASP Net websites and Console Applications. So unfortunately my bizarre love for windows forms isn’t yet supported. But I was keen to get my console app running on my Centos server.

First of all you can’t change an existing application over to a .Net Core app – or if there is I couldn’t see the option. So I had to create a new project and then port over my code. Thankfully this provided an excellent excuse to refactor my code. I did particularly enjoy that the code, for lack of a better term, just worked. I didn’t have any 3rd party NuGet packages or extra content, so the basic windows libraries could just be bolted on and the code compiled as normal. Within about 20 minutes I had completely ported over my applications, an hour after that I’d made it a little prettier.

Since I was finally moving my code over to the same server as the database I decided to remove the API calls and use a direct MySQL connector – now this meant that I did have to get a NuGet Package – specifically MySQL.Data this currently supports the standard .Net framework but it isn’t supported on .Net Core yet unless you get the RC or DMR version. I installed that, did some upgrades and compiled the app.

Setup on the Unix server

So – running it on Centos; I initially went and downloaded the 64 bit runtime binaries from the Microsoft blog local to my server, I then unzipped them and followed the generic instructions. Microsoft instructions tell you to unzip them and leave in your home directory for use but I wanted to put them in more of an application directory, so I did the following.

cd ~/ 
mkdir dotnet
cd ./dotnet
wget https://download.microsoft.com/download/5/F/0/5F0362BD-7D0A-4A9D-9BF9-022C6B15B04D/dotnet-runtime-2.0.0-linux-x64.tar.gz
tar zxvf dotnet-runtime-2.0.0-linux-x64.tar.gz
cd ../
mv ./dotnet /etc/

This then meant my .Net Core directory was at /etc/dotnet/… and I now needed to register the new application. Microsoft tells you to execute this in your command line but I found that each time you restarted your shell session it would forget what you’d set up, so in the end I added it to my local .bashrc file.

nano ~/.bashrc
#then at the bottom of the file added
export PATH=$PATH:/etc/dotnet

Save and now I could run any dotnet applications with the command dotnet such as “dotnet -h”

I did have some trouble on my first application run due to some missing libraries, but they were pretty easy to install through the usual package manager

yum install libicu libunwind

Package & Run my App

So I’m used to a console application building and dumping an executable in the output directory with an App Config and some, .Net Core uses JSON files and DLL’s for it’s binaries, though they shouldn’t be treat any different really, the main difference to factor in is that your unix installation doesn’t have a GAC – the GAC is the global assembly cache; when you run an application on windows, normally if the code references a DLL it’ll ask the GAC where the install path is, so it can be referenced and used as normal, even if that DLL hasn’t been shipped with the application.

Unix obviously doesn’t have a GAC – so when you try to run your application you need to make sure that instead of just moving your JSON and DLL files up to the server, you actually publish the application and move everything. To show you what I mean, below is the difference between the standard “Build” output of a .Net Core application vs the “Publish” output of the application.

The publish job packages up everything, including runtimes and referenced libraries, so in order for this to run on Unix, I needed to publish the application and move that output onto the server. Once it was on the server I could get away with just moving my main DLL up, but you must publish at least once or you may start to get runtime errors.

Once it’s all on your server, let it run.

dotnet ./ADFGX\ Server\ Module.dll

or if you want it to run in a background session kick it off with a screen

screen -dmS DotNetApp dotnet ./ADFGX\ Server\ Module.dll
screen -x DotNetApp

Conclusion

All in all I’m very pleased with the .Net core stuff, it’s downsized the number of IDE’s I need to have installed and means I can now start hosting some more windows technologies on my Unix server which should save me a few pennies as well.

Hopefully in the coming months we see Microsoft bringing out some more application types and looking forward to more NuGet support. But what I’ve seen so far of .Net Core seems really stable, very easy to set up and really easy to migrate your existing stuff over to.

Steam Link on a Raspberry Pi

A while ago I once again blitzed what was on my Raspberry Pi and started a new project using Retropie. Retropie is Debian based but has no desktop environment to speak of. You switch it on, it runs emulationstation, emulationstation runs other apps. It’s fairly basic but it also has an optional package for Kodi, so I could replace my bastardised Openelec box and my dedicated Raspbian box and find something in the happy middle ground.

While I won’t go into Retropie as there is a lot of content already out there – I thought I’d cover something a little newer. “Moonlight (formerly known as Limelight) is an open source implementation of NVIDIA’s GameStream protocol. We implemented the protocol used by the NVIDIA Shield and wrote a set of 3rd party clients.”

Pre-Requisites:

  • Pi 2 (the model I have, 3 will probably be fine but the 1 might struggle)
  • Debian Jesse based system, as I said I’m using Retropie (Although Arch is also supported)
  • An Nvidia card running Geforce Experience – mine is a GTX 960 so I’m benchmarking at that
  • A fairly stable network connection, my Pi and PC are both wired connection but WiFi may slow things down
  • SSH connection to your Pi and some basic command line knowledge

Installation

So first of all install the source-repo where we can download moonlight. Open up your apt sources list and add their deb archive.

$sudo nano /etc/apt/sources.list
deb http://archive.itimmer.nl/raspbian/moonlight jessie main

An example of mine is below


Now you need to add the GPG Key, this key verifies that all the packages you’re downloading have come from the same verified source – to prevent you installing rogue packages.

cd ~/
wget http://archive.itimmer.nl/itimmer.gpg
sudo apt-key add itimmer.gpg
apt-get update
apt-get install moonlight-embedded
rm itimmer.gpg

And that is the package installed.

Preparing for streaming
For this next section it’s probably a good idea to set up SSH on your host PC, you’ll need it to complete the setup process. First of all, you need to set up Nvidia Shield streaming. This is done through the GeForce settings menu, simply open up the GeForce screen, click the cog at the top right, select “Shield” from the menu and enable the GAMESTREAM option.


After that, ssh into your Pi and by running the following command you can try to connect to your PC

moonlight pair

This will scan the local network for nvidia shield servers, hopefully it will find your local machine and attempt to connect. When it does this it will offer a 4 digit pin which you must then enter on your host machine. Once it’s synced then steam big picture will likely launch, and in the lowest resolution possible. Just let it launch and then close it – stopping the stream. This should close moonlight running on your Pi too.

So the resolution is terrible, At this point it is worth familiarising yourself with moonlight by using man moonlight in which you will probably see that appending the flag -1080 or -720 will run the stream in 1080 and 720 respectively, and that the stream command will connect to a paired server. Therefore you can run your game stream using

moonlight stream -1080

This should launch big picture, on your pi, in 1080 resolution, which would be ideal – if not for the controller mapping. Most applications these days support controller mapping, and it’s a damned sight easier than it used to be, the only pain is mapping everything on each device. Thankfully moonlight supports this, simply use the following command to create a mapping configuration file.

moonlight map ~/Controller1.map
#Now just follow the steps on screen

Worth noting that the .map extension and the name of the file can be changed to whatever you want.

Once mapping is complete, move it to a more memorable location than on the home folder, I created a new folder in the RetroPie roms folder as I knew i’d be working out of there later.

mkdir ~/RetroPie/roms/moonlight/
mv Controller1.map ~/RetroPie/roms/moonlight/xpad-config

and now I can launch Big Picture, from my Pi, with my Xpad device mapped with the following command
moonlight stream -1080 -mapping /home/pi/RetroPie/roms/moonlight/xpad-config

Integrating into Retropie
Retropie’s menu structure is quite simple. There are a number of systems, those system on boot will scan a configured directory for files of a certain extension, those files when selected will execute a custom command in the shell. So in terms of our streaming platform, we just need to write a script to run the stream and have the system execute that. You could if you’re not a huge fan of having custom menus just stick it in the Ports System menu – but I’m getting ahead of myself.

As we already know the command to run our stream we just need to wrap that up in a bash script as below. Create a new file and enter the following nano ~/Retropie/roms/ports/moonlight.sh
#!/bin/bash
moonlight stream -1080 -mapping /home/pi/RetroPie/roms/moonlight/xpad-config

Save the file and make sure it has execute permissions chmod +x ~/Retropie/roms/ports/moonlight.sh and lo and behold if you navigate into your Ports folder on your retropie system you should see “MOONLIGHT” and executing it should start the game stream. You can stop here if you want. If you want to go further and create your own system menu for Emulationstation (like in the screenshot below) then keep reading.

First of all you need to create a custom systems config directory, this allows you to edit the systems XML without breaking the original. To do this simply back up the main systems config from the emulationstation install to your personal settings. You may find you’ve already done some of these steps for Kodi, so be careful not to overwrite your systems config if you’ve already done some manipulation in this area.

sudo cp /etc/emulationstation/es_systems.cfg ~/.emulationstation/es_systems.cfg

Then open it up with nano ~/.emulationstation/es_systems.cfg and scroll to the bottom. You need to add a new System node for moonlight, which will scan a certain directory for certain file types, the same as any other system in Emulationstation does. So you need to create a new <system> node at the end of the file, but before the </systemList> entry. My system entry looked like it does on the right


If you’d like more information on what each node means you can check the wiki in the sources of this article. The main focus are the and elements. When emaulationstation launches it will load in system “Moonlight” and scan the <path> directory for any files ending with extension .<extension> in this case it’s going to look in ~/RetroPie/roms/moonlight for any .sh files.

So all that’s left for us to do is create the directory and copy our run time script.

cp ~/Retropie/roms/ports/Moonlight.sh ~/RetroPie/roms/moonlight/Moonlight.sh

Now when you reboot or reload ES you should see a moonlight option in the systems menu, when loaded it contains the MOONLIGHT script, which provided the host PC you paired earlier is switched on will launch Steam Big Picture.

The only extra problem with this, is it kind of looks like crap…

This is because the theme settings for this don’t exist, and the default theme is the text value of the system, with plain white everything. It’s a little bit blinding so lets move onto the next section.

Creating a theme for Moonlight
This part took me the longest – mainly because I have frack all design skill and the folder structure was a bit funky – but essentially similar to the systems config we copied, the theme is a setup of vectors and XML documents so there’s not harm in cloning your current setup and making a ‘custom’ copy.

My current skin is “Eudora” so make sure when you start work you’re using the right folder to match your skin, as I spent a good 20 minutes editing Carbon to no avail. You can check which skin you use by checking the UI settings in your RetroPie menu.

So first of all copy your current skin and it’s contents to a working folder, then rename it so that EmulationStation can differentiate between the skins.

sudo cp -r /etc/emulationstation/themes/eudora /opt/retropie/configs/all/emulationstation/themes/eudora-custom

Then navigate inside and create a new folder for our theme, it has to match the value of the <theme> element we specified in the System config, I found it a lot easier to just clone an existing theme and replace the artwork, as everything is just based off vectors anyway…

cd /opt/retropie/configs/all/emulationstation/themes/eudora-custom
cp -r ./kodi ./moonlight
cd ./moonlight

Now inside the moonlight theme folder I had 3 files (I know in carbon there is an additional Art folder so just bear in mind that the folder structure of a skin differs) 1 was the theme xml doc, one was the graphic for the “controller” i.e the transparent object which appears above the central bar in the menu, and one was the logo, which appears on the central bar in the emulationstation menu.

So all I had to do was replace controller.svg and logo.svg. Annoyingly but understandably, these are vector images. You can’t just whack them into Photoshop and expect it to work. I recommend Inkscape if you’re after something free and quick, but if you want to do some proper work on the subject I think you need to head down the Adobe illustrator route. I was just after a quick job so inkscape did me fine. I found a steam SVG icon online and uploaded that for the “controller”, then I opened the same image in Inkscape and added the text “Moonlight” I did try playing around with some effects, but like I said, I’m not a designer. It’s a little lacking but it works, and it got rid of the brilliant white and I know what it is now.

I uploaded both images via sftp into the target folder, then through the Emulationstation menu changed my skin from Eudora to Eudora-Custom, rebooted and that was it. Custom menu entry for a steam link running on my Raspberry Pi.

Sources:

Moonlight Website
Moonlight WiKi
Add a new system in Emulationstation

Setting up Raspbian Virtual Desktop with VNC, SSH and Samba

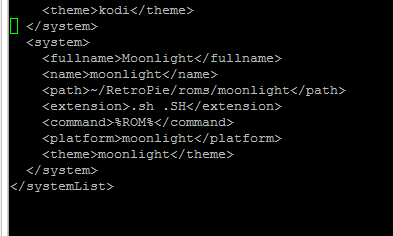
A few months ago while having some issues updating Openelec on my RPi I decided to blitz the SD card and go FULL Openelec with a fresh install of version 6. However this had some problems, namely that it no longer functioned as a file server – or rather it could, but the lack of options to configure ports, passwords and other configs generally make file hosting through Openelec a huge security risk, and even if you hack your way around the read-only filesystem, it just gets overwritten when it next updates.

I decided to buy another Raspberry Pi. With the model 3 out now, model 2’s became a lot cheaper. I picked up one here for £25. I decided early on it was just going to be a fileserver, so after it was set up I wasn’t going to need a keyboard/Mouse/HDMI plugged in. Just power, hard drive and network – with the aim to control everything via VNC and SSH.

The Pi arrived, and I installed Raspbian on the SD card and plugged it in, I’d gone for a direct install of Raspbian so didn’t get the setup I had seen before when using NOOBS, however you can trigger this yourself from the terminal. So open up the terminal and type

sudo raspi-config

Then you can go through the setup process. After I had set that stuff up the way I wanted I had the following to-do list:

  • Configure SSH to be more secure.
  • Mount my external HDD locally.
  • Install samba and configure it to share the hard drive over the network
  • Install VNC and set it to launch on startup as a virtual desktop
Configure SSH to be more secure

SSH can be brute forced, that shouldn’t be a surprise. Raspbian by default will give you a default username and password. If you haven’t changed it already, change your password, you can do this by opening up the terminal and entering the command passwd
I also find that you can avoid most bot attacks if you simply change the default port that SSH runs on, so I recommend opening up the config file located at /etc/ssh/sshd_config and changing the value for Port, the default is 22 – change it to something memorable, then either restart the Pi or use sudo service sshd restart

You should now be able to access your raspberry pi from any given SSH client with ssh pi@192.168.0.X -p 1234 Where X is the IP address and 1234 is the secret port you set up.

Mount my external HDD locally

Linux can pretty much mount anything (phrasing) it will prefer stuff formatted for EXT3/4 but can also read from NTFS, FAT and HFS file systems. When you plug in a hard drive it will by default mount itself in the folder /media/. I wanted to mount my hard drive in another location just for the sake of ease. To do this you need to create a folder as a mount point and then configure the fstab to mount the device in that location.

So first of all, figure out what your device is called, to do this plug the device in, open up the terminal and use the command sudo blkid if your device has a name (My device is called “JOES-SLAB”) then you should be able to pick it out of the list of results.

~$ sudo blkid
/dev/sda1: LABEL="JOES-SLAB" UUID="82AA5C66AA5C58AD" TYPE="ntfs" PARTUUID="7dd7743f-01"

So I can see that my external NTFS HDD is mounted on /dev/sda1. Copy and paste the UUID as you will need that later. At this point you should unmount the drive, leave it plugged in but use the command

umount /dev/sda1

Where /dev/sda1 is the mount point of your device. If it successfully unmounts then you need to open up and edit /etc/fstab This file will be root protected so you’ll need to open with elevated permissions.
The fstab is a table which gives the system information on how to mount certain devices. It may already have information in it, this is fine, just got to the bottom of the file and start a new row. The fstab takes 6 fields

  • Device
  • Mount Point
  • Filesystem
  • Options
  • Dump
  • Pass

So, using the UUID you recorded earlier you can add your device to the fstab. An example of mine is below, then an explantion of what each field means.

UUID=82AA5C66AA5C58AD   /home/pi/Documents      ntfs-3g         uid=1000,gid=1000,umask=022     0       0

Device: UUID=82AA5C66AA5C58AD – Each storage device will have a UUID, this lets the operating system know how to mount this device
Mount Point: /home/pi/Documents – When I open this folder the contents of the hard drive will be displayed. This file path needs to exist in order for this to work so you need to create this directory if its not already there.
Filesystem: ntfs-3g – my hard drive uses NTFS, the 3g options is an external package which helps with the read/write stuff. In all fairness I’m not all that clued up, this is just what works. If your hard drive is FAT or HFS(+) have a google as to what you need to put in here.
Options: uid=1000,gid=1000,umask=022 – NTFS hard drives don’t let you change read/write/execute permissions after they’re mounted so you need to set them up here. This setup will give you ownership and set the hard drive permissions to 755, so only user pi has the ability to write to the HDD but others can read and execute.
Dump & Pass: 0 – No idea, that’s just what you need to put

Save the fstab, then in the terminal run sudo mount -a this will reload everything in the fstab. If everything went to plan, you should find the contents of your HDD listed under /home/pi/Documents (or whatever mount point you specified)

Install samba and configure it to share the hard drive over the network

Samba is a package in unix/linux that allows for file and printer sharing across a local area network, I used this mainly so I could map the hard drive on my raspberry pi on other devices, like my windows laptop and PC.

Samba is probably already installed, but run sudo apt-get install samba just in case. Once installed you can find the main configuration file at /etc/samba/smb.conf open that up with elevated permissions. The file will already contain a lot of configurations, some of them are contained within a parent configuration which is denoted by the [] brackets. For instance at the top level is [global].

Under [homes] I added my own custom configuration, as before I’ll show the code then explain each option.

[Public Documents]
   comment = Public Documents
   path = /home/pi/Documents
   guest ok = no
   browseable = yes
   read only = no
   create mask = 0755
   directory mask = 0755

[Public Documents] – this lets samba know that its reading a new configuration section, this is also how the folder will appear when viewing from another device, for example if I logged into my pi from my PC I would see \\raspberrypi\Public Documents
Comment: A description of the drive, usually I give the same value as above
path – this is the local path to the location you wish to share across the network (it matches our HDD mount point)
guest ok – No, I want people to log in before they access my hard drive! If you’re not bothered you can set this to ‘yes’
browseable – Yes, I want to be able to browse the drive
read only – No, I want to be able to write to the drive
create/directory mask – The permissions applied to the network drive

Save and quit. Now since I specified that guests were not okay, the final thing to do is to set up your user as a valid login. To do this, in the console use the command smbpasswd pi. This will allow you to set a password with samba for your login, you are allowed to set the same password as when you were configuring SSH, which means when accessing the drive remotely you can login with your usual username and password. You can always specify a different user than “pi” but I’m not sure how that would conflict with the fstab permissions on the drive. Also remember that in future if you change your password to update both.

Restart samba with the command sudo /etc/init.d/samba restart after which you should be able to access your hard drive from another device across the network. On windows I can map the drive using the map network drive wizard, and connecting using different credentials, where I enter the Pi’s username and password. Sometimes you may need to specify the domain of the user account, as windows will sometimes try to log you in as a local user rather than a remote one (i.e “WindowsPc\pi” rather than “raspberrypi\pi”) So just be sure to specify the domain name of your pi, if you don’t know what this is use the command hostname on your pi and it should tell you. As in the screenshots below.

Map Network 1

If all has gone according to plan, your remote drive should show under the z:\ on your windows device (or phone, or tablet)

Map Network 2Map Network 3

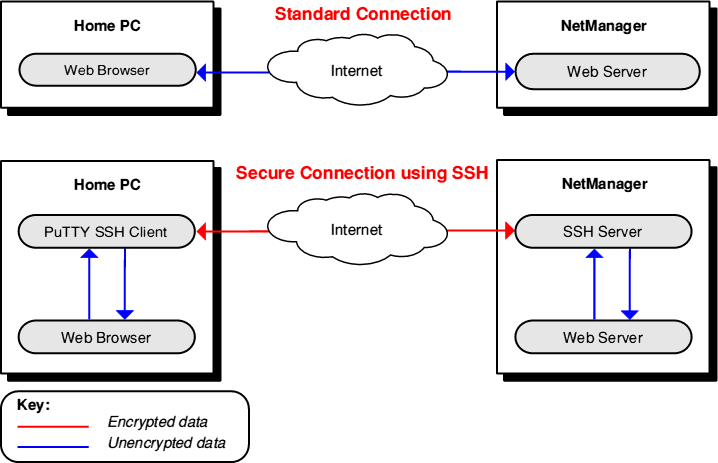
Can I access my files from outside my local network?

Yes you can actually, not through Samba though. If you’ve configured SSH properly you should be able to port forward the secret port you specified to your device externally, for this you’ll need to give your device a static IP on your network and set up the port forward rule – these are usually done through your router/gateway.

Once you have port forwarding setup you can actually use SFTP to access your files. SFTP is like FTP but uses an SSH connection to secure and tunnel the connection so you don’t need to install anything new. With any file transfer program that can handle SFTP you can connect using sftp pi@X.X.X.X -p 1234 again where X.X.X.X is your public external IP address and 1234 is the secret SSH port you set up.Screenshot_20160426-133354

Linux has SFTP support built in, for windows devices and android I recommend


Install VNC and set it to launch on startup as a virtual desktop

The final step is to install and setup VNC, VNC is a server application which will allow you to connect to a device and view the desktop and optionally use the keyboard and mouse as a means of remote desktop control. It’s old tech but I prefer that as it can be used with almost any device, and you can still secure it (although the method we’re going to use only uses 8 character passwords for some god awful reason)

In my experience Raspbian has 2 main VNC packages, Tight-VNC and Vino-VNC. Vino works by allowing the VNC server to assume direct control of XSession in progress, if you had a monitor connected you would see the mouse cursor moving, opening files and typing. Tight-VNC creates virtual XSessions which are identical to your normal desktop, but you don’t need a monitor and even if you did have one plugged in, the session you control through VNC would not be the same.

I opted for TightVNC in this case, as I did not need my RPi to be plugged into a monitor, keyboard or mouse after it was setup. Install TightVNC by opening the terminal and typing sudo apt-get install tightvncserver once installed you can run the application, on first run you will be asked to set up a password. As a mentioned earlier you can only set up an 8 character password, you can enter more text – so if you can only remember a longer password you can still type it in, the program will just truncate it. Run TightVNC with the command vncserver You will be asked to enter a password and then verify, then you’ll be offered to setup a view-only password. This you can give out to people so they can view your desktop but have no control.

Once the server is running you will likely see a message like New 'X' desktop is running on raspberrypi:1. This means your VNC server is now running on virtual desktop 1. The virtual desktop ports correspond to actual TCP ports too. By default VNC servers start at port 5900, so when TightVNC says it’s running on raspberrypi:1 what it means is “Locally I’m running on desktop 1, externally I’m running on port 5901”. TightVNC cannot run on port :0 as this is the REAL desktop environment, so when you just run vnc without any extra parameters it will default to run on port 5901. If you have a VNC client on another machine on your local are network you can connect to your VNC server with X.X.X.X:5901, and entering the password you created in the setup. If you want to run on a different virtual desktop port, just remember that any other devices on your network will need to access it via the TCP port 5900 + the value you set as the virtual desktop, I’ll explain more on that as we go.

End the VNC server session with the command vncserver -kill :1. This will terminate any VNC servers running on virtual desktop 1. Since we want our VNC server to start on system load, and we want to customize the setup the easiest thing to do is figure out what options we want to run the server with, and then automatically run that setup on system startup. You have a few options but I only want to set resolution and colour depth. So, create your new script and enter the following. I’ll explain what it does after

vncserver :101 -geometry 1366x768 -depth 24

:101 this is the virtual desktop, this directly affects the TCP port which your VNC server runs on, so my server would run on port 6001 (starting at 5900 + 101), again changing the port is a good way to avoid most bot attacks.
-depth 24 Sets the colour depth, if you have a particularly slow connection you can
-geometry 1366×768 this sets the resolution of your virtual desktop. It can be as big or small as you like, I set it to this because it will fit onto the smallest device in my house without much scaling, but you can set to anything you see fit.

Now you have a command which will run the VNC server, on the port and resolution you want, you just need to make this command run automatically. I found that sometimes the server booted up before the desktop environment. You’ve got free reign here to chose your own method, but I found the one below works best – originally from this post

Open up a new text file and enter the following text

[Unit]
Description=TightVNC remote desktop server
After=sshd.service

[Service]
Type=dbus
ExecStart=/usr/bin/tightvncserver :101 -geometry 1366x768 -depth 24
User=pi
Type=forking

[Install]
WantedBy=multi-user.target

Save it under the directory /etc/systemd/system/tightvncserver.service The only thing you may need to alter is the line starting ExecStart, where you can see our command to start the server. You may notice that vncserver has been replaced by /usr/bin/tightvncserver don’t worry about this too much as its essentially the same command, you’re just providing an absolute path to the binaries to execute it, you can also alter the user running the service if you wish.

Once the file is in place you need to make it owned by the root user and then install it as a system service. Open terminal and run the following commands.

#Configure the script to run at startup
sudo chown root:root /etc/systemd/system/tightvncserver.service
sudo chmod 755 /etc/systemd/system/tightvncserver.service
sudo systemctl enable tightvncserver.service

If you want to test that your script is running, run the following command and you should see either the vnc startup message, or an error if its already running.

#To test the script is working
sudo systemctl start tightvncserver.service

To test it’s working, restart your device and see if you can connect to the VNC Server.

Once it’s working the way you want, you can disconnect your keyboard, mouse and monitor as your Raspberry Pi is now running as a virtual environment.

To connect to your VNC server I recommend the following clients (sorry I don’t have any Mac devices)

Can I access my VNC server outside of my network?
Yes, you can, but you shouldn’t, having your VNC exposed makes you vulnerable to a few attacks, and once they break your VNC server they can actually control your device without needing your password so it’s not wise to simply port forward your VNC port. I recommend using SSH tunnelling, which the android app I suggested will support. I discussed this in more depth in one of my previous articles here. It depends on how secure you want things to be, but yes, there’s no reason why you can’t remote control your device over the internet.

A strange bug with VNC having no taskbar
When I was connecting to my desktop session, I found that all I saw was my desktop wallpaper. This was because the Xsession desktop environment was not actually being loaded in the virtual desktop. You home directory contains a hidden folder called /home/pi/.config/lxpanel/ in this folder you have the potential to have a copy of the LXPanel config files, you just need to copy them from the system directory.

cp -r /etc/xdg/lxpanel/profile/LXDE /home/pi/.config/lxpanel
cp -r /etc/xdg/lxpanel/profile/LXDE-pi /home/pi/.config/lxpanel    #This command might fail if you're on an older RPi model

This should fix the LXPanel issues on your virtual desktop and you should be able to use VNC to controlVnc View1 your virtual desktop now.

Hosting Webmail for Multiple Domains

The hosting business I run on the side to my actual job has the odd client wanting their own mailing system. I set up a postfix/dovecot system on our VM not too long ago and it’s been slowly building up into an actual workable system. We have had some issues regarding a PHP exploit and some spam but that’s an ongoing pain in the arse and another story altogether.

One of the obvious problems with hosting your own mail server is; how do people actually see their mail? We offer IMAP and SMTP support so they can plug in their own clients but what if they want an actual interface? Well there are a number of pre-made solutions, which are just websites which hook into your internal (or remote) mailing system. We decided to go with Roundcube, comes with its own online installer, needs MySQL and some extra PHP functions but it’s well documented and the install process is fairly easy – we set up roundcube for 3 systems, including myself.

The problem came when I tried to set up roundcube for our 4th client, I realised that fundamentally there was no difference in terms of the backend, despite using their own URLs they all resolve to the same location and the site itself was identical, save for 1 or two configs. They were also all using individual databases (belonging to their sites) and it dawned on me that I had the same table setups across 4 databases for no particular reason…

I decided to downsize and force everybody to use the same client. I started with a new setup of Roundcube and made backups of the data (not the schema/table structure) from every clients individual database and compiled into one script. The user ID’s need to be manually amended (obviously each domains users started from 1) but thankfully in total we had about 11 users so it wasn’t difficult to go down the list and change the ID’s.

Since we use virtualhosts on our sites, and I wanted to enable the mail portal for every site, the easiest thing to do was create an Alias file. An Alias will redirect any traffic for a particular argument to a specified destination. For example, I wanted every site with a /Mail url to navigate to our the new Roundcube installation. So I created the following file

nano /etc/httpd/conf.d/Mail.conf
$

Alias /newmail /var/www/Mail
Alias /Mail /var/www/Mail
Alias /mail /var/www/Mail
#EOF

service httpd restart

This enabled any site we host to be redirected to the roundcube installation whenever they used any of the alias’ specified. for example http://mycustomdomain.com/Mail

Then it was just a matter of making the configs unique. The easiest way to do this that I’ve found is to use PHP’s $_SERVER attribute to detect basic information like which URL has been used to access the site, then to use this information to assign values in the config. You can set Roundcube to pass in the Username and Password from the logged in user for SMTP auth when they try to send, and by default they try to login via IMAP so users are properly authenticated. As I said before you can use PHP to detect the URL which is being used to access the page, so in the config file itself you can just set a number of parameters into an array, then load these in while the config is being read. As in the code below taken from my config.inc.php file in the Roundcube Config directory

//Now some fancy scripting to set the logo based on the domain viewing the page
$CustomerArray= array();
$CustomerArray[] = array("domain" => "vandebilt.co", "logo" => "http://vandebilt.co/Archive/images/joelogowhite.png");
$CustomerArray[] = array("domain" => "anotherdomain.co.uk", "logo" => "http://anotherdomain.co.uk/logo-250.png");

for ($i = 0; $i < COUNT($CustomerArray); $i++)
{
    //If the URL being used to view the site contains the domain name
    if (strpos($_SERVER["SERVER_NAME"],$CustomerArray[$i]["domain"]) !== false)
    {
        $config['skin_logo'] = $CustomerArray[$i]["logo"];
        $config['product_name'] = $CustomerArray[$i]["domain"] . ' Webmail';
    }
}

You can expand the array to hold as many config items as you like per domain, then during the loop load them in as the site parameters. So if I were to access the site vandebilt.co/Mail I would see my own logo, then if I were to access anotherdomain.co.uk/Mail, I would see their logo. This gives the users the impression that they have their own webmail portal, but it is in fact just the same site with some very basic config hacks to make it seem like their own. This lets us downsize on server space, share plugin configurations, only need to debug one site and ultimately support it better.

Roundcube Webmail Client

Unix Command Line Cloud Storage

When I originally set up my Minecraft server some 4 years ago I designed a script to automatically backup the world, plugins and database entries to a Dropbox folder, the script would run in the middle of the night and email me with the output, such is the beauty of cron. The Dropbox daemon running in the background would pick up the new files and sync them online. A simple solution.

As time went on the script became more complex to handle certain issues I had – making sure before we backup the files the previous were deleted, and when they were deleted we wait for dropbox to finish syncing before shoving the new ones in its place. That tended to avoid most data conflicts I experienced.

Eventually as time went on and we moved away from Minecraft (although still running it) we started hosting websites for ourselves, small projects we work on and even some other people. It became sensible to extend the script to backup websites, mail directories and server configurations, in the event of a system collapse. Dropbox, despite its many features, didn’t provide enough space, I’d managed to accrue 3.5gb of free space through the various bonus’ they have but it was no longer enough. On top of this our Minecraft server runs Centos 5 – which although still supported by RedHat until 2017 is old, after a recent format of the MC server I tried to reinstall Dropbox only to find that Dropbox could no longer be run, and even if I downgraded there was no way to connect the server to my account due to the version difference. After asking on the Dropbox community if there were any plans to go back to support RHEL5 it was a begrudging no.

Alternatives are available, due to a bonus I received with my phone my Google Drive has over 100Gb of space, but no command line (nothing official or native at least) I had a look around at some of the other Cloud Solutions and found Copy.

While not seeming very elaborate or exciting (as exciting as cloud storage can get) it was supported on Android, iOS, Windows and Linux – as well as providing 15GB for a basic account . This would easily cover my needs.

Unfortunately, Copy also didn’t provide support for RHEL5, so as it happens my MC server is still without a proper Daemon running. However I’ve worked around it by using an SCP script to just shove everything onto my newer, fancier, RHEL6 box.

The Copy daemon can be downloaded from their site in a .tar.gz – uncompress it and stick it somewhere where you normally stick programs. For me it was /etc/copy/

wget https://copy.com/install/linux/Copy.tgz --no-check-certificate
tar zxvf ./Copy.tgz
mv ./copy /etc/
cd /etc/copy/x86_64

If you’re running purely in command line the only thing you need to run is CopyConsole, which can be found in either the x86 or x86_64 folders. Initially to set it up you need to provide your username, password and the directory you wish to set as the directory to sync.

mkdir /root/Copy
./CopyConsole -u=myemail@domain.com -p="my password with spaces" -r=/root/Copy

This should then connect to your account and try to sync. Try adding some files through the web interface and seeing if you notice them downloading. Obviously running the command in the foreground you’re stuck watching the console, so run it in a screen. Once you’re ran the Console app with the required arguments it will have written a config in your home directory, so you don’t need to pass them again and always have them visible in your processes.

screen -dmS CopyDaemon /etc/copy/x86_64/CopyConsole -r=/root/Copy
screen -x CopyDaemon
Ctrl+A+D to detach from screen

That will let your app run happily in the background, and anything you put into /root/Copy will be synced. One other thing to do would be to check that the daemon is running when you do your backup job – I’m not sure how reliable this service is yet.

echo "Checking Copy Daemon status..."
SERVICE='CopyConsole'
if ps ax | grep -v grep | grep $SERVICE > /dev/null
then
echo "$SERVICE service running"
echo ""
else
echo "$SERVICE is not running, Starting now"
echo ""
screen -dmS CopyDaemon /etc/copy/x86_64/CopyConsole -r=/root/Copy/
sleep 10
fi

The only downsides to Copy over Dropbox is that I find the sync speeds much slower, there is also no Status interface, so I can’t quite figure out to automate checking if Copy is done Syncing, however it seems to be a bit lighter on the processor (much more so than Google Drive) so all in all seems a worthwhile investment until Dropbox offers up more support or Google Drive goes native.

Sources:

  1. Dropbox
  2. Copy
  3. Checking to see if a service is running in a shell script

Integrating SoapUI tests with TeamCity

I recently set up a CI server for a new project at work, as the senior staff were quite keen on implimenting the tech I had recently pioneered on another project. After configuring the build, including automated nUnit tests, database, web and service deployments I was asked if I could integrate automated testing using SoapUI – something the test team had been pioneering for this project too.

SoapUI being a very lightweight, very powerful tool for testing Soap requests against a web service, such as an API or end-point. You can build a fairly expansive library of requests, configure the expected results and set pass/fail criteria based on those returning messages. So as a tool to test our new API, it was an obvious choice.

The SoapUI project had been created in its own SVN repository, so in TeamCity it was quite simple to create a SoapUI build configuration on its own, rather than stick it on the end of another build (although you can easily set the SoapUI tests to be triggered on success)

I won’t get into the whole TeamCity configuration because it is vast I’ll just stick to the SoapUI stuff. Before we begin, housekeeping so you know what I’m talking about:

  • OS: Windows Server 2012 R2
  • User Permissions: Administrator (Read, Write & Execute)
  • TeamCity: 9.1.4 (build 37293)
  • SoapUI: 5.2.1 (OpenSource)

I decided to install the full SoapUI package on the CI server, if you’re strapped for space I would imagine there is a way to use the testrunner as a standalone app – but the full package is only 250mb, so it wasn’t a huge impact.

In the installation directory “<install path>\bin\” there is a file named TestRunner.bat and TestRunner.sh if you’re a unix user. This batch file can be fed a multitude of arguments to be able to run your SoapUI project and generate results files. This is important since TeamCity cannot explicitly get the results while the batch is running (other than failure/success exit codes).

The TestRunner can be run directly through a “Command Line” build step in TeamCity, however I felt I needed more steps in order to organise and clear out space on the drive so I wrote my own Batch file which would do a little housekeeping, then run the TestRunner. Some people used MSBuild for this task – though I felt there wasn’t quite enough info for me to approach it that way, so I’ve gone old school and wrote a windows batch as follows.

@echo off
E:
IF EXIST E:\SmartBear\SoapReports\Results (
::Delete the output directory
echo "Reporting ouptut directory exists, deleting it"
RMDIR E:\SmartBear\SoapReports\Results /S /Q
)
mkdir E:\SmartBear\SoapReports\Results
E:\SmartBear\SoapUI-5.2.1\bin\testrunner.bat -rajI "E:\TeamCity\buildAgent\work\SWIM_TEST\SWIM-ware-soapui-project.xml" -f "E:\SmartBear\SoapReports\Results"

The idea being that the batch creates an output directory for the results, clears out any old files, then runs our TestRunner. The TestRunner as I said before takes a multitude of arguments for a variety of things. In this case I’ve used 5

  • -r: Turns on printing of a small summary report
  • -a: Turns on exporting of all test results, not only errors
  • -j: Turns on exporting of JUnit-compatible reports, see below
  • -I: Do not stop if error occurs, ignore them: Execution does not stop if error occurs, but no detailed information about errors are stored to the log.
  • -f: Specifies the root folder to which test results should be exported

The -I argument was an important as when the TestRunner does it’s thing, if any of the tests fail TeamCity will pick up on the errors and mark the entire job as failed – this is obviously not the point in testing – we want detailed errors on the failures, not just a failed job – the I flag will remove some printing to the console but this can be pulled out later on from the test results.

After the -rajI command is the path to the SoapUI project, and after the -f argument is the path to where I wanted my results to go.

When I first ran the Job I encountered an issue where the build would not proceed beyond the “All Plugins Loaded” step – I searched the internet not finding much beyond others experiencing the same. I discovered eventually that the TestRunner was not capable of generating a soapui-settings.xml file and as such was asking me every time I ran the TestRunner if I wanted to send my usage data to SmartBear, while generally unrelated it was waiting for me to select an option, and blocking the rest of the job. The solution of which was to generate a settings file, which I did by launching the UI once. If you aren’t running the UI, I uploaded my sample config in a forum post here.

SoapUISettingsI also had a few issues in my error logs relating to the max_connections_per_host value as it was set to an empty string and Soap was trying to parse it as an integer. I had to manually update this setting to a numeric value. This can be done either through the front end or by manually editing your settings xml (Key HttpSettings@max_connections_per_host)


Edit through the front end using File > Preferences and under the HTTP Settings you can find the options.

So I now had my TeamCity Build config downloading the SoapUI from the server, and running the test cases – and I could see the output. Unfortunately all it was accomplishing was telling me it had successfully run – no actual test results. I was following a tutorial but it got a little vague about now on how to proceed.

When the TestRunner completes it generates a number of .txt files – these summarise the message and response from the server, as well as some header information and the rest of it. TestRunner also generates a summary .xml file, however this is just a top level summary of the execution. SO in order to get some proper reporting done you need to do 2 things. First, read in your XML results file(s), Second is to publish the failed tests as artefacts to provide greater detail on the failures.

For the first part – in your build configuration go to “Build Features” add a new XML report processing of report type “Ant JUnit” – since this is the type that SoapUI exports (due to the -j argument). You need to then add a monitoring rule to point TeamCity to the path where the report summary is kept. For me this was the followingCapture2

+:E:\SmartBear\SoapReports\Results\*.xml

Adding this Build Feature will allow the after-testing report to be read into TeamCity, showing you the number of failed and Passed Tests. The only issue is that when viewing the stacktrace the information isn’t great – at best you will see the failed assertion from the test case. To improve on this we can read in the individual test outcomes from the reports folder. This is mentioned here, but it is rather vaguely worded so it took me a while to figure out.

Under General Settings in your build configuration you can add files to be captured as artefacts – these will be saved along with the build run so the physical files can be deleted, and the legacy artefacts can be removed depending on your TeamCity Configuration: To capture the artefacts add the path with a wildcard for *FAILED.txt – this is because every failed test in SoapUI produces an outcome file which ends with that string, so you can capture the details of the failed tests relatively easily.

Artefact Paths

Now when you run your SoapUI build, the tests will run, the top down failures and passes will be displayed and you can check your artefacts for detailed errors, including what message was sent and what message was received back. Very handy.

Sources:

  1. SoapUI – Running Functional Tests
  2. Running SoapUI Tests in Teamcity
  3. Integration with TeamCity – TeamCity waiting on a condition.
  4. Setting your preferences in SoapUI


VNC Brute Force & Tunnelling

On my Linux blog I posted a few bits and pieces about my Raspberry Pi, (one post of which I think found its way to this site, but I digress) One of those posts was about setting up a VNC server on a Raspberry Pi to allow remote control over your network.

Now I used VNC a lot in my home, primarily for my laptop and home entertainment server as I like to control them from across either the living room or my bedroom, as they’re mostly used for media. So since my RPi was going to be my one-stop-shop for media, file storage and if I ever get round to it, some server hosting. I thought I may as well configure the VNC server to be accessible from the internet.

Similar to when you’re learning to drive, you never really know why you have to check your blind spot until you’re in a situation where you really should have checked your blind spot.
I.E you just nearly side-swiped somebody.

I used to have the same mentality about security, I always chose strong passwords that’s obvious but never bothered with firewalls or encryption or anything of that nature. Not with anything as harmless as the remote control I use for my server anyway.

Well for my VNC application I had some issues with password authentication, so I foolishly thought “Nah nobody will ever try VNC on this particular IP” how wrong I was. Not more than a week later I sat down to watch some TV and found that there had been some files downloaded to my desktop, some windows opened on my web browser and somebody had tried to install something. It’s a very odd feeling to have been ‘hacked’ (I use the term loosely because it was my own fault) but thankfully my external HDD hadn’t arrived yet and so the pi held little more than the OS and a wallpaper jpg. Needless to say I formatted the hard drive and put a strong password on my VNC access as well as removing password-less command execution from the default Pi account, so now I need to put in my password before executing anything (which incidentally has broken the shutdown button)

Then over the past few weeks there have been instances where I couldn’t connect to my VNC server, I chalked it up to Linux being a bit dodgy on some software packages, particularly with the arm architecture, however today I thought I was going to get to the bottom of it. When checking the screen that VINO was running in I found a series of deferred authentication attempts, and a new one was being written every second. After a brief look on the Ubuntu forums I found that it was in fact evidence that a brute force was taking place, trying to break in through my VNC password.

Thankfully Vino has a feature where after a few consistent attempts at a password it will assume there is a brute force taking place and immediately start to deny everything coming in, which I was thankful for since there are actually now files on that server.

So since it appeared that I was still not safe from pesky hackers (and I was being hacked this time) I had to beef up the security. Putting even stronger passwords on my VNC and user account on the pi. After some research I decided the best course of action would be to actually tunnel the VNC connection through my SSH.


It was the diagrams that really sold me on it

The benefits of this being that any data sent between the remote host and the client are actually encrypted through the SSH Server (which is a fair bit more secure than a standard VNC Connection), and SSH tunnelling means I don’t have to have a port forward for the VNC server itself, just the SSH server. So with the 5900 port switched off on my router, I was able to tunnel my VNC connection through the SSH server and back out to the other side – where it connected to the actual VNC server. Theres a very handy wiki on how to VNC over an SSH Tunnel here link so I won’t bother recounting my steps. It’s also very straightforward and the android app I use for VNC had an option to use SSH tunnelling (which you can find here) so I didn’t even need to find a new VNC app.

As an added precaution I changed the default port of my SSH server from 22. Since I now knew brute forcing random IPs was a thing I decided maybe being on the default option for everything was asking to be a target which you can do via the config found in

sudo nano /etc/ssh/sshd_config

probably best to take a backup though.

So there we have it, I was hacked and now I know more about SSH tunnelling and poor security.

Now we just wait for the next attack…

Retiring Legend of Drongo

The LOD project has been going since 2012 and it’s starting to get to a little stale. As a developer I feel I have advanced far beyond the original intent of the game and I think I’m ready to hang it up before it keels under it’s own heavy, bulky and unnecessary code.

I had intended on making Drongo into a UI based game, using windows forms to generate graphics, however this is proving to be a great deal more difficult given the current flexibility of the code. The way the data is generated and saved and used is all outdated and poor. It was never really designed, more so just thrown together into some working model.

So I have decided to abandon the UI development of Drongo. I will revert the code back to a Console Application using only text as input and output, and just leave it with that. Eventually I may finish the environment but I do not plan on adding any more features to the game. As of now the UI for Legend Of Drongo has been scrapped and any fixes to the engine will be applied to the old console app setup.

That is not to say that this is the end. I have been considering for a long time to shelf the project and start fresh with my newer knowledge and attempt to make a Visual Engine from scratch, using elements from the first project. Which is why I’m happy to announce development on Legend-Of-Drongo-II, which will hopefully have some good progress as time goes on.

« Older posts

© 2025 Joe van de Bilt

Theme by Anders NorenUp ↑